Tinkering with STM32
For a change of pace, I wanted to work on an embedded project, but being the "systems programmer" that I am, without a proper working knowledge of the electrical signals (well, I do have a degree, but it's not in electrical engineering), I decided to tinker with the STM32 microcontroller. After borrowing one from a friend (thanks, Royce!) I started to tinker with it, but I found myself working with a STM32 Cube IDE, and that just won't do, will it?
QEMU
![]()
Enter QEMU. It is a virtual machine that emulates a CPU, and it is very useful for testing and debugging embedded software. After a brief hiatus with the STM32 Cube IDE, I decided to give it a try, because I wanted to try out other boards, and test my mettle with other boards, and a barebones approach. I had been using autogenerated codebases from the STM32 Cube IDE, and a lot of things are hidden under the hood. Becoming and embedded engineer would require me to interface directly with unknown hardware, for which no SDK exists (maybe I would have to write my own)!
For simplicity's sake, I decided to work with the netduinoplus2 board, which is supported by QEMU, under the machine name of "netduinoplus2". It is a arm cortex-m4 board, which was analogous to the stm32-f4discovery board I borrowed from my friend.
Finding stuff?
Now that I had my board, I needed a workflow. Trying to to cheat too much from lowlevel learning on youtube (his tutorials are aweeeeeesome btw), I gathered the information about the necessary bits from the internet, and his videos. Here were the basic things I would need:
- A toolchain
- A bootloader (mayhaps not, I will explain this later)
- A linker script
- Build system
Toolchain
This was trivial. I had a working toolchain, and I just needed to add the necessary bits to make it work with the board.
A Linker Script
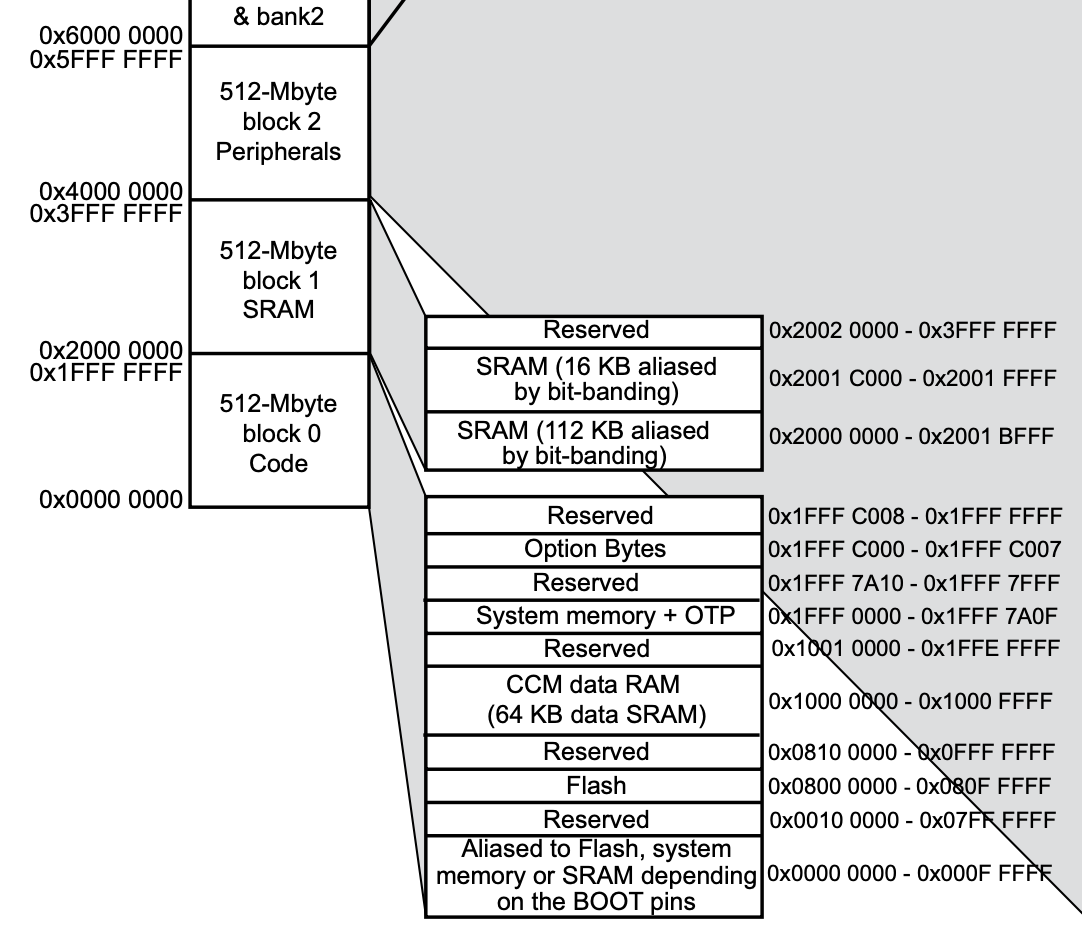
This is where I spent most of my time. First of all, the linker script needs the memory map of the board. I looked at the description of the netduinoplus2 board on the QEMU docs, and found that it uses STM32F405RGT6 microcontroller. I wanted the memory map but I was too lazy to check out the datasheet, so I poked around the qemu repo inside https://github.com/qemu/qemu/blob/master/hw/arm/netduinoplus2.c, but I didn't find anything. Oh well. After a quick search, I found the datasheet and the rest is history. Well, not really.
Inside the datasheet, I found the memory map. The way netduinoplus2 boots up is configured by the boot-up pins, and the inital couple of bytes in the memory map (4G) are aliased depending on the boot pin configuration. In my case, it would boot up directly from flash which is at 0x08000000.
Build System
I used my trusty old mate, 'Make' for this purpose. I also wanted to use gdb to debug the code, which the toolchain brings along with it.
The adventure begins
Armed with my half-baked knowledge of writing .. well .. everything, I started my journey. I had a head full of ideas, eyes full of dreams, and brain full of nothing. So I wrote this.
A simple main
Our main does not need to do a lot. It just needs to exist. And well, loop.
void
Then this will get compiled with a "stub bootloader". IDK where I got this idea, but the concept of mixing the arm assembly (and learning a bit of it), and calling C code sounded too sexy to pass up.
.extern main
.global _start

_start:
    b main
Then our linker script will come into play and help us organize these bits:
ENTRY(_start)

MEMORY{
     FLASH ( rw ) : ORIGIN = 0x08000000 , LENGTH = 1M
     RAM ( xrw) : ORIGIN = 0x20000000 , LENGTH = 112K
}

SECTIONS
{
    . = 0x8000;

    .text :
    {
        *(.text._start)        /* Ensure _start is placed first */
        *(.text*)              /* All other .text sections from input files */
        *(.rodata*)            /* Read-only data */
    } > FLASH
}
Since I am too poor at maths, I used an online calculator to find the lengths of the memory regions. Ahh, the code is looking sexy already.
Now, to tie it all together, I need a makefile.
TARGET=
CORTEX=
CFLAGS=
CC=
LD=
AS=
OBJDUMP=
OBJCOPY=
:
: : : :
Just look at that makefile. So clean. So concise. So sexy...

Well, I digress. Now the time to run everything.
This led me to a profound realization - this is why embedded engineers are so hard to find (and unhinged).
Analyzing the crash
No matter how hard I tried, I couldn't find the cause of the crash. Surprisingly, it is easier to find the tutorial on Rust (mi cheri) than on C (mi cherry). I was able to find some blog posts, but they just were not working out. Turns out, I had my linker script all wrong.
Looking at the linker script
A quick look at the linker script shows a fatal flaw: 0x8000 is not the start of the .text section. So that line went away. After a couple of 5-minutes of debugging, I found the problem. The glaring issue. The bane of my code. (add more drama here).
The IVT
The interrupt vector table is a table of addresses of the interrupt handlers. The first entry in the IVT is the stack pointer base, followed by the reset handler, the nmi handler, the hard fault handler, and so on.
The reset handler is the first thing that runs when the processor boots up.
I did not have that.
Ugh.
The rectification was simple.
MEMORY
{
    FLASH (rx) : ORIGIN = 0x08000000, LENGTH = 1M
    RAM (rwx)  : ORIGIN = 0x20000000, LENGTH = 112K
}

SECTIONS
{
    .text :
    {
        *(.text._start)        /* Ensure _start is placed first */
        *(.text*)              /* All other .text sections */
        *(.rodata*)            /* Read-only data */
        . = ALIGN(4);
    } > FLASH
}
The bootloader
The bootloader was mostly fine. I was thinking about the bootloader-main connection, and I thought that it would be best to initialize the IVT in the bootloader, and then jump to the main. So I set about writing the IVT in the bootloader. In the end, I removed the bootloader asm, and rewrite the bootloader in C.
extern void ;
// Stack top starts at the end of the ram boundary.
// This is technically the last mem location we can access.
// https://www.st.com/resource/en/datasheet/stm32f405rg.pdf
// The entry function (mentioned in our linker script).
// IDK What else I should add at this point, as this can be main instead of this.
void
// NOTE: SUPERR important. If this does not exist, the CPU will NOT take us to the
// _start function, i.e. reset handler.
// Interrupt Vector Table
uint32_t isr_vector = ;
It's a bit of a mess? but it works.
The main
The main is pretty much the same. Pretty and useless.
Running + debugging
Now I recompiled everything. It compiled fine. Now was the time to run it with qemu. It hung up.
The question remains - did it hang up in the bootloader loop, or did it hang up in the main loop? I wasn't sure. Enter, gdb.
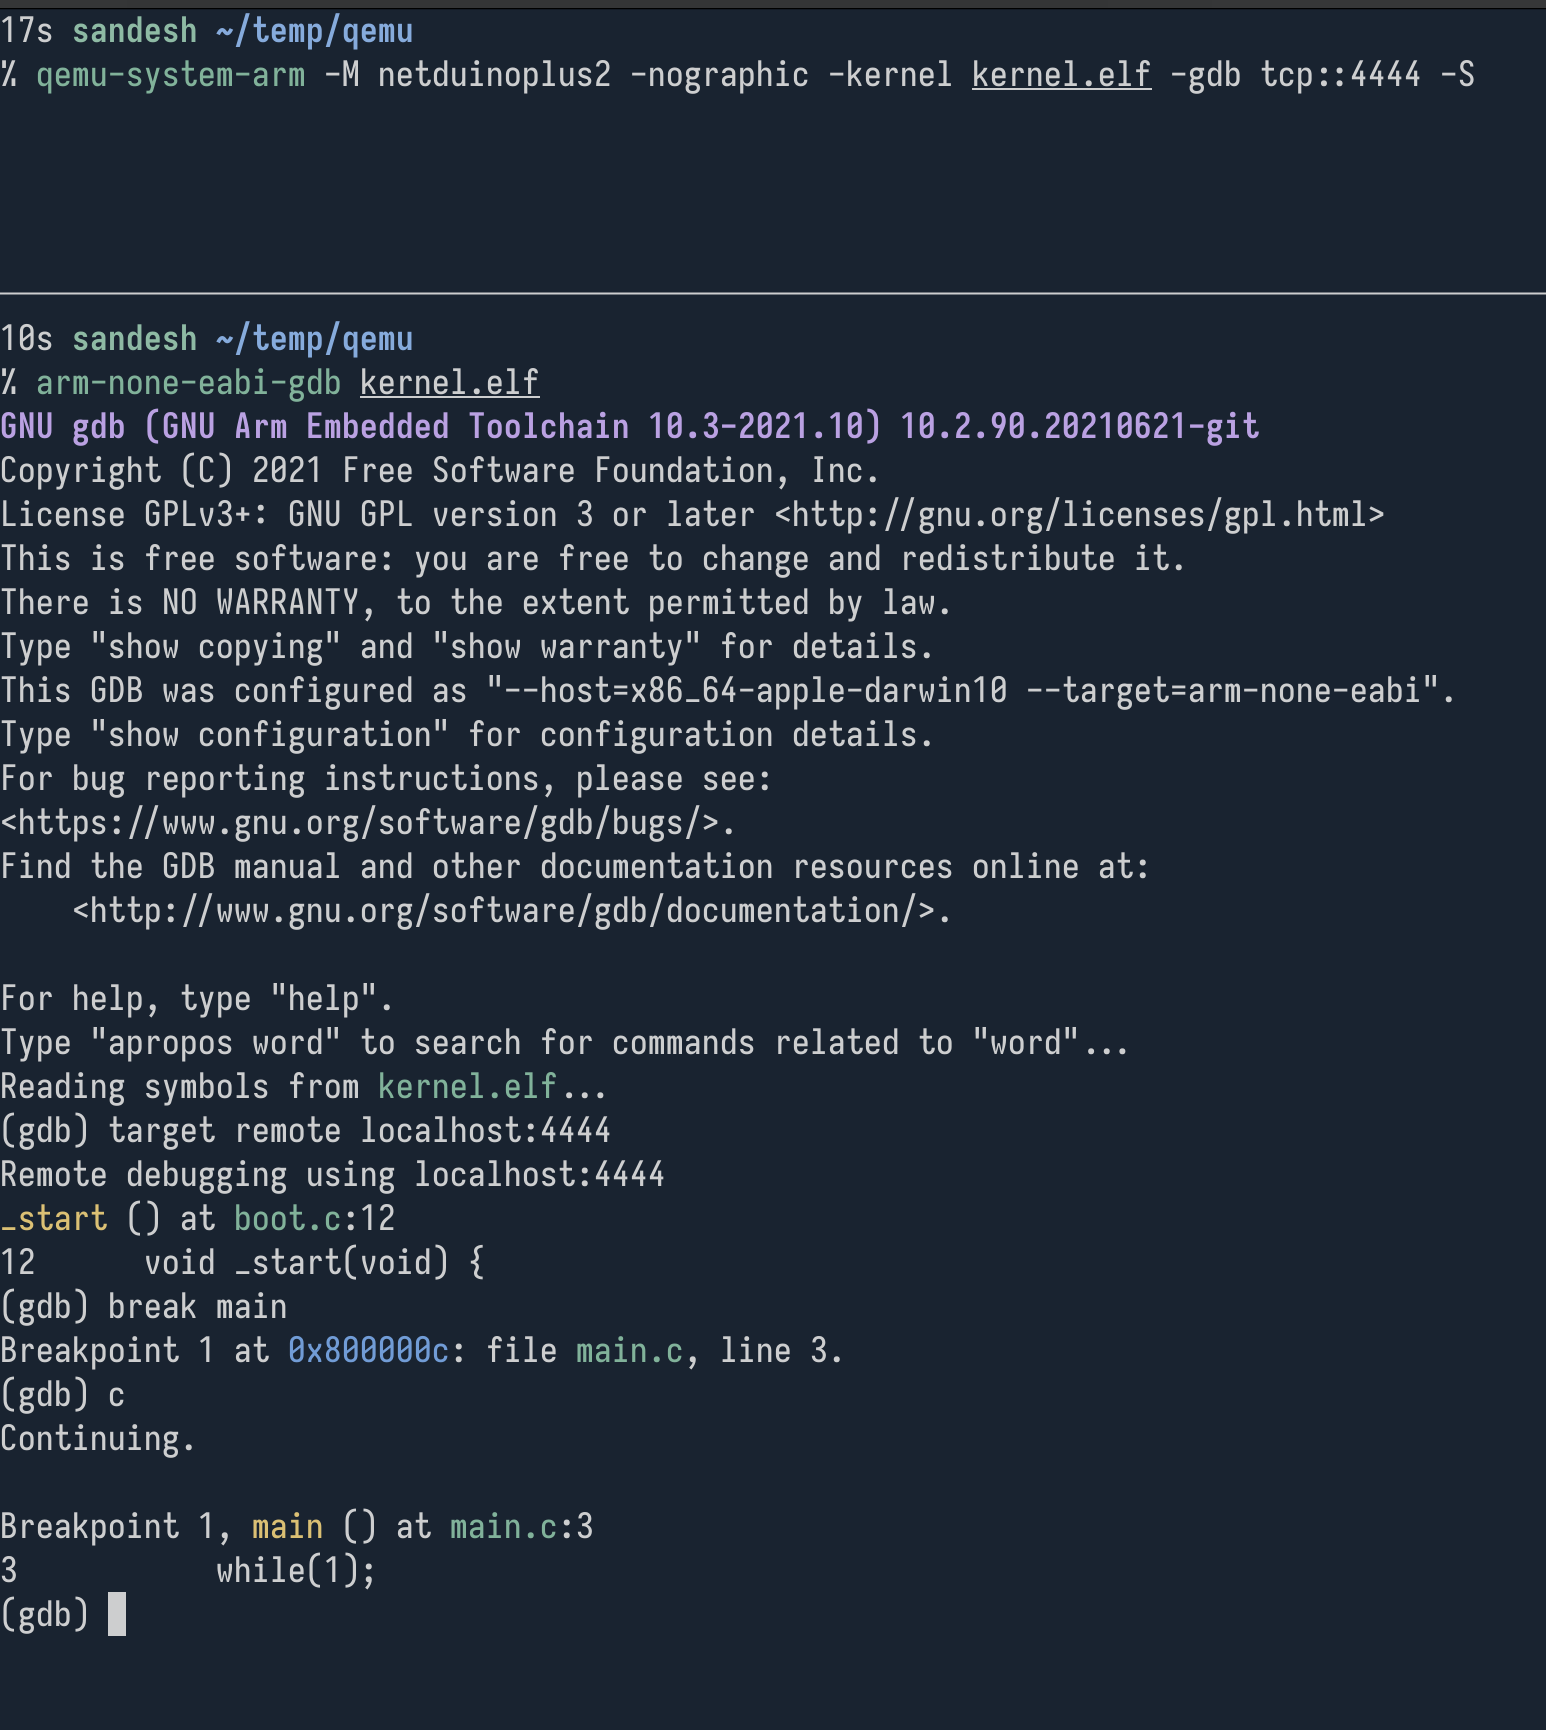
Running gdb with the qemu binary is pretty simple; in one pane, you run the qemu binary, and in the other one, run gdb. In the pane with qemu, run it like:
This suspends the execution of the kernel (which we will resume from gdb).
In the gdb pane, run gdb like:
)
)
)
<https://www.gnu.org/software/gdb/bugs/>.
<http://www.gnu.org/software/gdb/documentation/>.
Then attach to the gdb session:
()
{
()
Finally, continue the execution:
()
)
);
()
And voila! We are in main.
What did we learn? What's moving forward?
It's more about what I learned:
- It's not easy to debug embedded software unless you get into a debug env. Before a debug env, I cannot imagine how hard it is to debug a program.
- IVT is a cool thing. Don't forget it.
- A lot of infrastructure has gone into building these toolchains (qemu, gdb, linker scripts, etc.). I came to have a deep sense of appreciation for all the engineers who develop that.
Now that I have a somewhat working program, I can start to think about how to make it more useful. I am thinking about exploring Rust (esp in RISC-V) for my upcoming posts, since I recently bought a Milk-V board (which is super cool). Here's to learning a lot, and I hope to see you in the future.
If you omit one of the colons in the tcp::4444, the qemu gods will be very very angry with you.